전체 글타래
2022.12.18 - [Study/CI&CD] - 로컬 kubernetes에 Spinnaker 설치해 보기
2022.12.22 - [Study/CI&CD] - spinnaker CD 연동해 보기 - jenkins, kubernetes 연동, pipeline 사용
2022.12.26 - [Study/CI&CD] - spinnaker CD 연동해 보기 (2) - deploy manifest artifact 사용, SpEL 사용
2023.01.10 - [Study/CI&CD] - spinnaker CD 연동해 보기 (4) - pipeline template 사용해 보기
설정 백업하기
halyard를 통해 진행한 설정을 백업하고 복구할 수 있다.
다음과 같이 백업을 수행한다.
bash-5.0$ hal backup create
+ Create backup
  Success
+ Successfully created a backup at location:
/home/spinnaker/halyard-2022-12-23_05-24-32-596Z.tar
백업한 내용을 기준으로 다음처럼 복구할 수 있다.
hal backup restore --backup-path <backup-name>.tar아쉽게도 backup을 수행할 때 백업 위치를 지정하는 옵션이 없다.
docker volume mount 바로 상위 위치여서 container로 들어가 volume mount 대상 위치로 백업 파일을 이동시키는 번거로운 과정을 거쳐야 windows 폴더에서 접근해서 가져갈 수 있다.
parameter를 사용하여 Kubernetes Manifest를 작성하기
pipeline을 만들면 시작점에서 다양한 설정을 할 수 있는 항목이 있다.

이전 글에서 jenkins에서 job이 수행되고 난 후 spinnaker가 실행되도록 automated trigger의 항목을 설정해 보았다.
이때 jenkins에서 parameter를 전달받을 수도 있는데 우선 jenkins에서 넘겨받은 parameter가 아닌 pipeline에 직접 설정한 parameter를 사용하는 과정을 진행해 보았다.
Application이 많아지고 Deploy Manifest를 중복으로 계속 설정하여 사용하면 해당 설정을 공통화하고자 하는 요구가 생기게 된다.
내 경우 Application을 점점 추가하면서 다음과 같이 생기게 되었다.

(묶어서 하나의 Application으로 관리하는 게 더 좋은 방법인지는 잘 모르겠다.
일단 java application과 1:1로 spinnaker application을 생성하였다.)
이렇게 application을 추가하고 pipeline을 만들다 보니 모두 비슷한 manifest를 가지게 되었다.
따라서 Manifest를 공통으로 사용할 수 있도록 설정 부분을 parameter로 빼는 작업을 진행하였다.
Pipeline Expression 소개
https://spinnaker.io/docs/guides/user/pipeline/expressions/
spinnaker는 pipeline에서 실행 중에 변수를 동적으로 설정할 수 있도록 pipeline expression을 제공한다.
spinnaker의 설치를 진행하고 msa가 각 pod로 뜨는 것을 살펴보았다면 spinnaker가 spring으로 구성되어 있다는 것을 확인하였을 것이다.
Spring의 경우 SpEL을 제공하는데 Spinnaker의 pipeline expression은 Spring의 SpEL이기 때문에 Spring을 사용하는 개발자들은 아무런 학습비용 없이 pipeline expression을 사용할 수 있다.
parameter 추가하기
우선 pipeline expression으로 사용할 parameter를 추가하였다.
Configuration을 선택하고

Parameter 항목에서 사용할 parameter를 추가하였다.

Deploy Manifest에 parameter expression 사용하기
Deploy Manifest에 설정한 Kubernetes Deploy 설정은 기존에 다음과 같았다.
apiVersion: apps/v1
kind: Deployment
metadata:
  labels:
    app: bluesky-cloud-netflix-eureka-server
  name: bluesky-cloud-netflix-eureka-server-deployment
  namespace: default
spec:
  replicas: 1
  selector:
    matchLabels:
      app: bluesky-cloud-netflix-eureka-server
  template:
    metadata:
      labels:
        app: bluesky-cloud-netflix-eureka-server
    spec:
      containers:
        - args:
            - '--spring.profiles.active=k8sdev'
          image: '192.168.0.9:8083/luversof/bluesky-cloud-netflix-eureka-server:latest'
          name: spring
          ports:
            - containerPort: 30100
      imagePullSecrets:
        - name: regcred
---
apiVersion: v1
kind: Service
metadata:
  labels:
    app: bluesky-cloud-netflix-eureka-server
  name: bluesky-cloud-netflix-eureka-server-service
  namespace: default
spec:
  ports:
    - nodePort: 30100
      port: 30100
      protocol: TCP
      targetPort: 30100
  selector:
    app: bluesky-cloud-netflix-eureka-server
  type: NodePort
위 설정 중 profile 설정과 nodePort 설정은 아까 parameter로 설정하였었고 app name은 spinnaker application 이름과 동일하게 사용하고 있다.
위 내용은 아래처럼 변경하였다.
apiVersion: apps/v1
kind: Deployment
metadata:
  labels:
    app: '${execution.application}'
  name: '${execution.application}-deployment'
  namespace: default
spec:
  replicas: 1
  selector:
    matchLabels:
      app: '${execution.application}'
  template:
    metadata:
      labels:
        app: '${execution.application}'
    spec:
      containers:
        - args:
            - '--spring.profiles.active=${parameters.springProfilesActive}'
          image: '192.168.0.9:8083/luversof/${execution.application}:latest'
          name: spring
          ports:
            - containerPort: '${#toInt(parameters.nodePort)}'
      imagePullSecrets:
        - name: regcred
---
apiVersion: v1
kind: Service
metadata:
  labels:
    app: '${execution.application}'
  name: '${execution.application}-service'
  namespace: default
spec:
  ports:
    - nodePort: '${#toInt(parameters.nodePort)}'
      port: '${#toInt(parameters.nodePort)}'
      protocol: TCP
      targetPort: '${#toInt(parameters.nodePort)}'
  selector:
    app: '${execution.application}'
  type: NodePort
이렇게 설정을 하면서 모든 Deploy Manifest를 공통된 내용으로 사용할 수 있게 되었다.
pipeline expression 자동완성 되지 않는 문제가 있음
내 경우 pipeline 내 pipeline expression을 지원하는 모든 곳에서 ${...}를 입력하면 관련하여 사용할 수 있는 항목을 안내해주는 자동완성 기능이 동작하지 않았다.
다음과 같은 형태로 동작한다고 한다.

따로 설정을 해야 하는 것인지 왜 안 되는 것인지에 대해 원인을 찾지 못한 상태이다.
다만 spinnaker의 경우 자동완성을 쓰지 못하더라도 테스트할 수 있도록 Evauate variables Stage를 제공하고 있어서 해당 stage에서 pipeline expression을 테스트한 후 Deploy Manifest에 적용하였다.
Deploy Manifest를 외부 artifact로 사용하기
https://spinnaker.io/docs/reference/ref-artifacts/#enabling-artifact-support
parameterize manifest를 사용하여 pipeline별로 다른 값을 parameter로 변경하였고 여러 pipeline이 사용하는 Deploy Manifest는 이제 모두 동일한 내용을 가지게 되었다.
하지만 pipeline 마다 이 Manifest가 있기 때문에 변경해야 할 일이 있을 때 개별로 일일이 선언해야 하거나 또는 신규로 pipeline을 추가하더라도 동일한 내용을 복사해서 사용하는 문제가 있다.
template 자체를 외부에서 artifact로 두고 로 호출하여 사용하면 효율적인 관리가 가능하다.
artifact의 사용은 1.20 이후에 기본 활성화 되어있다.
Github 연동 설정하기
github연동을 우선 진행해 본다.
https://spinnaker.io/docs/setup/other_config/triggers/github/
우선 github에 webhook 설정을 진행한다.
spinnaker문서의 github webhook 설정 위치가 변경되어 찾지 못하는데 Settings -> Developer settings -> Persnal access tokens -> Find-grained personal access tokens나 Tokens (class)을 설정하면 된다. (위치는 추후 변동될 수 있다.)
이제 spinnaker에 github 연동 설정을 추가한다.
hal config artifact github enable
hal config artifact github account add bluesky-artifact-account  --token [생성한 토큰 값]
이제 Deply Manifest의 설정을 Text에서 github 주소로 변경한다.
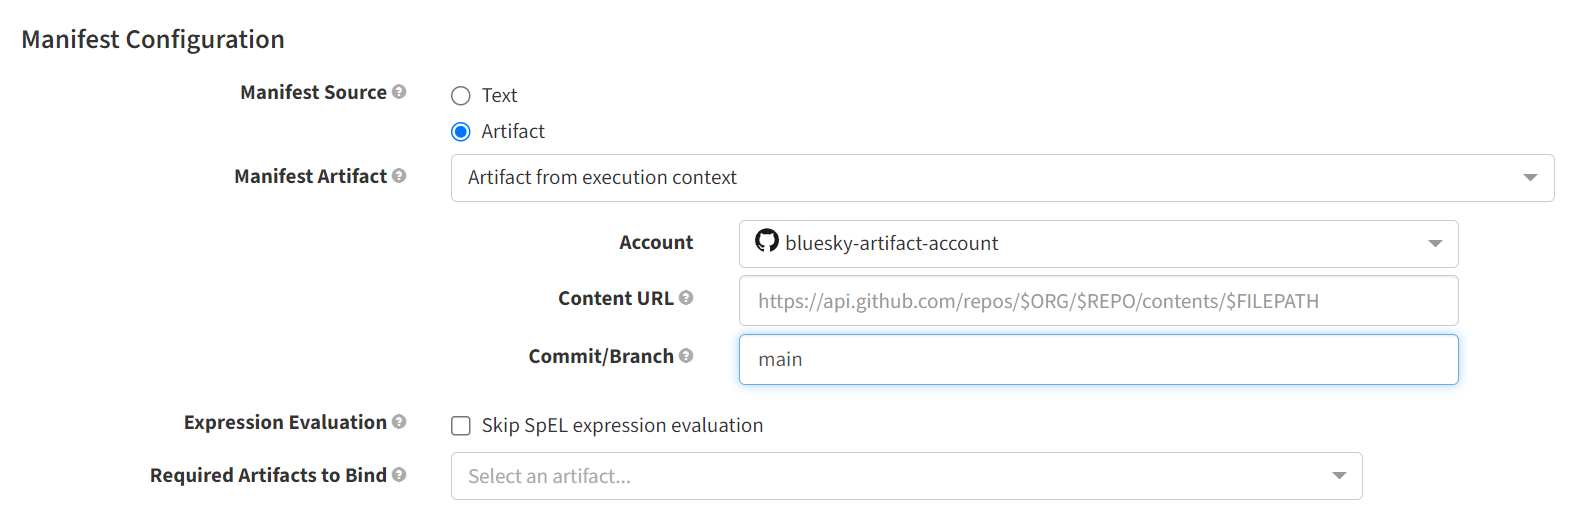
이제 Manifest를 각 pipeline이 복사해서 가지고 있지 않고 github에서 공통으로 관리하게 되었다.
pipeline template의 사용
이후 단계로 pipeline template을 사용할 수 있다.
pipeline template은 이전 단계에서 pipeline stage의 manifest를 하나의 artifact로 관리하는 것처럼 pipeline 자체를 하나의 template으로 관리한다.
사용하는 방법이 spin이라는 CLI 도구 또는 UI에서 사용할 수 있다고 하는데 ui에서 사용하는 건 아래처럼 설정을 활성화하면 된다고 한다.
hal config features edit --managed-pipeline-templates-v2-ui true
hal config features edit --pipeline-templates true
pipeline의 Configure에서 Pipeline Actions -> Export as Pipeline Template으로 내보낼 수 있다.

이렇게 export 하면 Pipeline Template에 보인다.

Create Pipeline으로 이 template을 사용한 pipeline을 만들 수 있다.

여기까지 기존에 만들어본 pipeline을 공통화하여 좀 더 효율적으로 관리하는 방법을 알아보았다.
'Study > CI&CD' 카테고리의 다른 글
| Argo CD 사용해 보기 (1) | 2024.03.19 |
|---|---|
| spinnaker CD 연동해 보기 (4) - pipeline template 사용해 보기 (0) | 2023.01.10 |
| spinnaker CD 연동해 보기 (3) - jenkins parameter 사용, kubernetes livenessProbe, readinessProbe 설정 (0) | 2023.01.01 |
| kubernetes ingress 사용해보기 (0) | 2022.12.28 |
| kubernetes pods 에서 curl 테스트 해보기 (0) | 2022.12.27 |
| spinnaker CD 연동해 보기 - jenkins, kubernetes 연동, pipeline 사용 (0) | 2022.12.22 |
| (Docker Desktop & Rancher Desktop) docker insecure registries 설정하기 (0) | 2022.12.21 |
| 로컬 kubernetes에 Spinnaker 설치해 보기 (0) | 2022.12.18 |
| [troubleshooting] sonarqube 사용 시 socket timeout 발생 (0) | 2022.07.09 |
| SonarLint & Connected Mode를 STS(Eclipse)에서 사용해보기 (0) | 2022.07.08 |


